The news aggregator Africa News Hub uses two instances of URL shortener, one for outgoing links to referenced sites, and another for incoming links included in messages posted on social networks. Polr, which defines itself as a modern and robust URL shortener, is used on both instances.
By default, having two Polr instances means there are two backends to manage, one for each intance. The Polr Admin package was created to make it simple to deal with multiple Polr instances.
Polr Admin is a package that allows you to manage multiple Polr instances from a single location. It is not a standalone application, but an extension to be installed on a running PHP application. The authentication and authorization functions are left to the application, and thus will not be discussed in this article.
The Polr Admin interface is displayed in a single web page, and uses Ajax to update its content. The Ajax function is implemented with the Jaxon library, which converts PHP classes into Javascript classes, so that they can be called directly from the browser.
This article describes the installation of Polr Admin with the Sonata Admin bundle, a package that allows you to create backends for the Symfony framework. For Africa News Hub, Polr Admin is integrated into a Laravel backend. Symfony was chosen for this article to show how, thanks to the Jaxon library, Polr Admin can be installed on other PHP frameworks.
The Polr Restful API
The Polr Admin package interacts with the Polr instances that it manages using the Polr API package, which wraps the Polr functions into a Restful API. It is therefore required to install Polr API on each instance of Polr to manage.
The Polr API package installs with Composer.
composer require lagdo/polr-api ~0.1
Then, you have to declare the package in the `bootstrap/app.php` file.
$app->register(\Lagdo\Polr\Api\PolrApiServiceProvider::class);
Once the Polr API package is installed, you must create an API key for a user on each instance of Polr. From here, it is possible to get access to Polr with an API testing tool like Postman.
We will now install Polr Admin on a different host. The next two sections describe how to install Symfony and the Sonata Admin bundle.
Symfony installation
We will begin by installing Symfony version 3.3, following the instructions given at https://symfony.com/doc/3.3/setup.html.
curl -LsS https://symfony.com/installer -o ~/bin/symfony
chmod a+x ~/bin/symfony
symfony new polr-admin 3.3
When the installation is complete, move into the Symfony directory and start the embedded web server.
cd polr-admin
php bin/console server:run
By browsing the address at http://localhost:8000/, you can see the above page, showing that the installation was successful.

The Sonata Admin bundle installation
The Sonata Admin bundle installs with Composer.
composer require sonata-project/admin-bundle
When the installation is complete, edit the app/AppKernel.php file to declare the Sonata bundles.
// ...
class AppKernel extends Kernel
{
    public function registerBundles()
    {
        $bundles = [
            // ...

            // These are the bundles the SonataAdminBundle relies on
            new Sonata\CoreBundle\SonataCoreBundle(),
            new Sonata\BlockBundle\SonataBlockBundle(),
            new Knp\Bundle\MenuBundle\KnpMenuBundle(),

            // And finally, the storage and SonataAdminBundle
            new Sonata\AdminBundle\SonataAdminBundle(),
        ];

        // ...
    }

    // ...
}
Then, configure the translations and the Sonata bundle in the app/config/config.yml file.
framework:
    translator: { fallbacks: [en] }

# ...

sonata_block:
    default_contexts: [cms]
    blocks:
        # enable the SonataAdminBundle block
        sonata.admin.block.admin_list:
            contexts: [admin]
Now add the Sonata bundle routes in the app/config/routing.yml file.
admin_area:
    resource: "@SonataAdminBundle/Resources/config/routing/sonata_admin.xml"
    prefix: /admin
Finally, run the following commands.
$ php bin/console cache:clear
$ php bin/console assets:install
The Sonata Admin bundle is now installed. The link http://localhost:8000/admin shows its homepage, which is empty for now.

Jaxon and Polr Admin installation
The jaxon-php/jaxon-symfony package that provides the Jaxon functions in a Symfony application can now be installed.
The views of the Polr Admin package use the Blade template engine, which requires the jaxon-php/jaxon-blade package to be installed.
$ composer require jaxon-php/jaxon-symfony ~2.0
$ composer require jaxon-php/jaxon-blade
$ composer require lagdo/polr-admin
When the installation is complete, declare the Jaxon bundle in the app/AppKernel.php file.
$bundles = array(
    ...
    new Jaxon\AjaxBundle\JaxonAjaxBundle(),
);
Configure the Jaxon bundle in the app/config/config.yml file.
imports:
    ...
    - { resource: jaxon.yml }
    - { resource: "@JaxonAjaxBundle/Resources/config/services.yml" }
Create the app/config/jaxon.yml file with the following content. It’s the Jaxon configuration.
parameters:
jaxon:
    app:
    lib:
        core:
            request:
                uri:     "ajax"
            prefix:
                class:   ""
            js:
                lib:
                app:
                extern:  false
                minify: false
            dialogs:
                default:
                    modal: bootbox
                    alert: noty
                    confirm: noty
In this configuration, the jaxon.lib.core.request.uri parameter indicates that Ajax requests will be sent to the URL /ajax. The parameters in the jaxon.lib.core.js section indicate that Jaxon’s Javascript code will be inserted directly into the web page, and the parameters in the jaxon.lib.dialogs section indicate that the modal windows will use the Bootbox library, while Alert and confirmation messages will use the Noty library. The corresponding files will be automatically loaded into the page by Jaxon.
Then define the following two routes in the app/config/routing.yml file.
polr_index:
    path: /polr
    defaults: { _controller: AppBundle:Polr:index }

polr_jaxon:
    path: /ajax
    defaults: { _controller: AppBundle:Polr:jaxon }
    methods: [POST]
The first route is linked to the PolrController::indexAction() function, which prints the dashboard home page. The second one is linked to the PolrController::jaxonAction() function, which will process Jaxon’s Ajax requests.
This is the controller code, to be saved in the src/AppBundle/Controller/PolrController.php file.
<?php

namespace AppBundle\Controller;
use Symfony\Bundle\FrameworkBundle\Controller\Controller;

class PolrController extends Controller
{
    private $jaxon;
    private $polr;

    protected function getJaxon()
    {
        $this->jaxon = $this->get('jaxon.ajax');
        $this->polr = $this->jaxon->package('polr.admin');
        $this->polr->config($this->get('kernel')->getProjectDir() . '/app/config/polradmin.yml');
    }

    /**
     * Show the Polr Admin page.
     *
     * @return void
     */
    public function indexAction()
    {
        $this->getJaxon();
        $this->jaxon->register();
        return $this->render('polr.html.twig', [
            'jaxon' => $this->jaxon,
            'polr' => $this->polr,
            'pageTitle' => "Symfony Framework",
        ]);
     }

    /**
     * Process a Jaxon request.
     *
     * @return void
     */
    public function jaxonAction()
    {
        $this->getJaxon();
        // Process the Jaxon request
        if($this->jaxon->canProcessRequest())
        {
            $this->jaxon->processRequest();
        }
    }
}
The PolrController::indexAction() function prints the app/Resources/views/polr.html.twig template, whose content follows.
{% extends '@SonataAdmin/standard_layout.html.twig' %}

{% block stylesheets %}
{{ parent() }}

{{ jaxon.css()|raw }}
{{ polr.css()|raw }}
{% endblock %}

{% block javascripts %}
{{ parent() }}

{{ jaxon.js()|raw }}
{{ jaxon.script()|raw }}
{{ polr.js()|raw }}

$(document).ready(function() {
    {{ polr.ready()|raw }}
});

{% endblock %}

{% block page_title 'Welcome to the PolrAdmin Demo application' %}

{% block content_title 'Polr Admin Dashboard' %}

{% block body_id 'polr-admin' %}

{% block body_class 'list' %}

{% block sonata_admin_content %}
{{ parent() }}

{{ polr.html()|raw }}

{% endblock %}
The Jaxon and Polr Admin packages are now installed.
The last step is to declare the instances of Polr to manage. This is done in the app/config/polradmin.yml file, as in the following example.
default: first
endpoints:
    first:
        name: First Polr Instance
        url: http://first.domain.tld
        api: api/v2
        key: 012365478978965412300321456987
    second:
        name: Second Polr Instance
        url: http://second.domain.tld
        api: api/v2
        key: 987456321003214569879874563210
In this configuration, the default parameter indicates the instance on which Polr Admin will connect by default, and the endpoints section contains the list of instances.
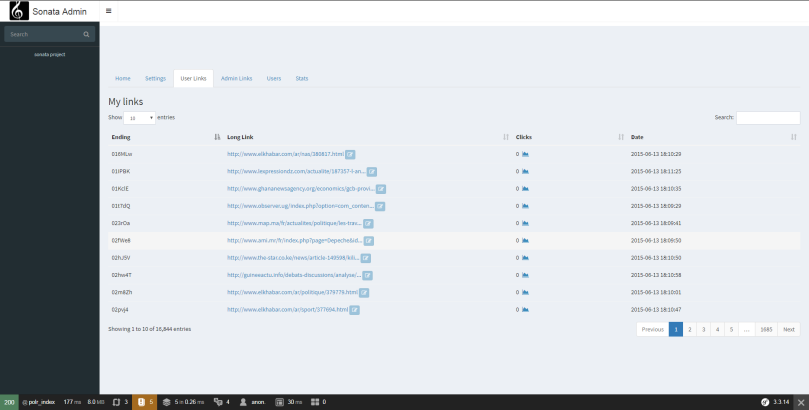
The Polr Admin is now installed and configured, and can be accessed at http://localhost:8000/polr. Here’s the homepage.

The Settings tab displays a drop-down list where the user can choose the current Polr instance.

The other tabs display the data of the current instance: the user’s list of links, the list of all links, the list of users, and the link access statistics.


The code for this article is online at this address: https://github.com/lagdo/polr-admin-sonata.